I came across this great answer from Jayan on how to invoke a Jenkins job with File parameter so I had to share (and bookmark it on the way :)
http://stackoverflow.com/questions/34517388/how-to-pass-file-to-jenkins-with-java
Monday, June 20, 2016
Sunday, June 12, 2016
6 tips to improve your exception handling by Dele Taylor - all cred
I saw this great article about exception handling, I've had to put a link to it from here also :)
https://northconcepts.com/blog/2013/01/18/6-tips-to-improve-your-exception-handling/
All credits goes to Dele Taylor
https://northconcepts.com/blog/2013/01/18/6-tips-to-improve-your-exception-handling/
All credits goes to Dele Taylor
Thursday, May 19, 2016
Invoking Jenkins Job using Jersey Client in Java with Username / Password authentication
General
The following post is document how to invoke a job using Jersery client in Java on Jenkins
Assumptions
- You are familiar with Jenkins and have permissions to create a new job
- I've used Jenkins version is 1.651.1 ( I'm guessing it will work on previous versions but I did not check)
- You are familiar with Maven
- You have IntelliJ ( I used Community Edition 2016.1)
Setup
Jenkins
Creating the job
- Connect your Jenknis
- Click on New Item
- In Item name type 'hello_world'
- Select 'Freestyle project'
- Press ok
Configuring the job
- Click on the job
- Press on the configure link from the left
- Check the 'This build is parameterized'
- Click on 'Add Parameter'
- Choose String Parameter
- In the name type 'firstname' (Leave the Default value and description empty)
- Scroll down to the Build section
- Click on 'Add build step' and choose Execute shell
- type 'echo ${firstname}'
Test the job
- Click on the 'Build with Parameters'
- Fill in a name click on the build number (should be #1) in case this job is new
- Click on Console Output
- You should see something like this
+ echo checking
checking
Java
Creating the project
- Open IntelliJ
- Click on 'Create New Project'
- Choose maven and click next
- GroupId: com.tzach.jenkins
- ArtifactId: jerseyclient
- Project name: jersey_client_jenkins
- Open the pom.xml file
- Add the following
<dependencies>
<dependency>
<groupId>org.glassfish.jersey.core</groupId>
<artifactId>jersey-client</artifactId>
<version>2.22.2</version>
</dependency>
</dependencies>
- Click on Enable auto import
- Click on Maven from the right and choose compile
- On the bottom you should see 'Process finished with exit code 0'
Now let's write some code
you can see the class @ https://github.com/tzachs/JenkinsJerseyClient/
- Create a new class named JenkinsJerseyClient
- Create the following method: Response invoke(String username, String password, String firstname)
- Paste the following
String target = "http://myjenkins:8080/job/hello_world/buildWithParameters";
HttpAuthenticationFeature httpAuthenticationFeature = HttpAuthenticationFeature.basicBuilder()
.credentials(username, password)
.build();
ClientConfig clientConfig = new ClientConfig();
clientConfig.register(httpAuthenticationFeature);
Client client = ClientBuilder.newClient(clientConfig);
WebTarget webTarget = client.target(target);
// Parameters needed for the job
Form form = new Form();
form.param("firstname", firstname);
// Sending invoke as POST
return webTarget.request(MediaType.APPLICATION_JSON_TYPE)
.post(Entity.entity(form, MediaType.APPLICATION_FORM_URLENCODED_TYPE));
- Replace the URL of jenkins to your jenkins
- Create a main method, and paste the following:
System.out.println(new JenkinsJerseyClient().invoke("tzachs","tzachs_password","tzach").getStatus());
- Replace 'tzachs' with your username
- Replace 'tzachs_password' with your password
- Replace 'tzach' with the parameters you need
- Full code looks like this:
import org.glassfish.jersey.client.ClientConfig;
import org.glassfish.jersey.client.authentication.HttpAuthenticationFeature;
import javax.ws.rs.client.Client;
import javax.ws.rs.client.ClientBuilder;
import javax.ws.rs.client.Entity;
import javax.ws.rs.client.WebTarget;
import javax.ws.rs.core.Form;
import javax.ws.rs.core.MediaType;
import javax.ws.rs.core.Response;
/**
* Created by tzachs on 5/19/2016.
*/
public class JenkinsJerseyClient {
public Response invoke(String username, String password, String firstname){
String target = "http://myjenkins:8080/job/hello_world/buildWithParameters";
HttpAuthenticationFeature httpAuthenticationFeature = HttpAuthenticationFeature.basicBuilder()
.credentials(username, password)
.build();
ClientConfig clientConfig = new ClientConfig();
clientConfig.register(httpAuthenticationFeature);
Client client = ClientBuilder.newClient(clientConfig);
WebTarget webTarget = client.target(target);
Form form = new Form();
form.param("firstname", firstname);
return webTarget.request(MediaType.APPLICATION_JSON_TYPE)
.post(Entity.entity(form, MediaType.APPLICATION_FORM_URLENCODED_TYPE));
}
public static void main(String[] args) {
System.out.println(new JenkinsJerseyClient().invoke("tzachs","tzachs_password","tzach").getStatus());
}
}
Run
- Run the main, you should see in the console log 201. If you see it, it's working. Go to jeknins see you have a new build number
Thursday, April 28, 2016
Connecting IntelliJ and JIRA with SSL (java.security.InvalidAlgorithmParameterException: the trustAnchors parameter must be non-empty)
Connecting IntelliJ and JIRA with SSL (java.security.InvalidAlgorithmParameterException: the trustAnchors parameter must be non-empty)
My work place change the JIRA connection from HTTP to HTTPS meaning now JIRA was working with SSL.
Everything was working fine with Chrome but when trying to work with IntelliJ and JIRA using the Atlassian plugin (https://confluence.atlassian.com/display/IDEPLUGIN/Installing+the+IntelliJ+Connector) I've encountered the following error:

Clicking on Show Details was not that helpful and displayed the following stack trace:
com.atlassian.theplugin.commons.remoteapi.RemoteApiException: javax.net.ssl.SSLException: java.lang.RuntimeException: Unexpected error: java.security.InvalidAlgorithmParameterException: the trustAnchors parameter must be non-empty
at com.atlassian.connector.commons.jira.soap.JIRASoapSessionImpl.login(JIRASoapSessionImpl.java:193)
at com.atlassian.connector.commons.jira.JIRASoapAndXmlServerFacade2Impl.testServerConnection(JIRASoapAndXmlServerFacade2Impl.java:154)
at sun.reflect.NativeMethodAccessorImpl.invoke0(Native Method)
at sun.reflect.NativeMethodAccessorImpl.invoke(NativeMethodAccessorImpl.java:62)
at sun.reflect.DelegatingMethodAccessorImpl.invoke(DelegatingMethodAccessorImpl.java:43)
at java.lang.reflect.Method.invoke(Method.java:497)
at com.atlassian.connector.commons.jira.JIRAServerFacade2Impl$1.invoke(JIRAServerFacade2Impl.java:93)
at com.sun.proxy.$Proxy41.testServerConnection(Unknown Source)
at com.atlassian.connector.commons.jira.JIRAServerFacade2Impl.testServerConnection(JIRAServerFacade2Impl.java:268)
at com.atlassian.theplugin.commons.jira.IntelliJJiraServerFacade.testServerConnection(IntelliJJiraServerFacade.java:473)
at com.atlassian.theplugin.idea.config.serverconfig.ProductConnector.connect(ProductConnector.java:35)
at com.atlassian.theplugin.ConnectionWrapper.run(ConnectionWrapper.java:63)
The problem
Intellij now needed the Certificate JIRA was using in order to establish a connection
How to solve?
Thanks to the IT guy at my work, I understood I needed to fetch the certificate and tell IntelliJ to use the key store in which I loaded the certificate to.
Here is how to do it.
- You have JRE / JDK installed
- Make sure you have openssl.exe (I'm assuming you are on windows). If you don't have you can get it by installing openvpn (get it from here https://openvpn.net/)
- Open command line
- Execute: openssl s_client -connect <JIRA_DNS_NAME>:443 where <JIRA_DNS_NAME> should be replaced with the your JIRA dns name / IP (for example openssl s_client -connect jira:443)
- Copy the output the last command generated from ---BEGIN CERTIFICATE--- to ---END CERTIFICATE-- including those lines to a file named public.cert
- Execute: keytool -import-alias <NAME_OF_ALIAS> -file public.cert. For example, keytool -import -alias jira -file public.cert
- It will ask for a password. The default password is 'changeit'
- Answer yes to 'Trust this certificate'
- You should receive 'Certificate was added to keystore'
- Verify the certificate was really added using the following command: keytool -list | findstr <NAME_OF_ALIAS>, for exampe keytool -list | findstr jira
- You should see something like this: jira, Apr 28, 2016, trustedCertEntry,
- Go to the installation of IntelliJ. Default installation in windows is at 'C:\Program Files (x86)\JetBrains\<INTELLIJ_PRODUCT>\bin'
- If you have multiple installation, notice which one you choose, in my case it was 'C:\Program Files (x86)\JetBrains\IntelliJ IDEA Community Edition 2016.1.1\bin'
- Edit the file idea.exe.vmoptions (or idea64.exe.vmoptions, depends which one you are running)
- Add the following: -Djavax.net.ssl.trustStore=c:\Users\<YOUR USERNAME>\.keystore, for example, in my case it was '-Djavax.net.ssl.trustStore=c:\Users\tzachs\.keystore'
- Restart IntelliJ
Troubleshoot
In case something does not work, check the idea.log.
The idea.log depends on your OS so check here for more info - https://intellij-support.jetbrains.com/hc/en-us/articles/206544519-Directories-used-by-the-IDE-to-store-settings-caches-plugins-and-logs
For more reading
Sunday, April 3, 2016
Java script not working in Jenkins due new Content security policy, chrome console log 'displays allow-scripts' permission is not set.
Problem
We run tests using our Jenkins CI and our report contains java script. From version 1.625 LTS we saw that our report is corrupted, meaning most of it is gone.
Displaying the console (F12 in chrome) revealed the problem:
Blocked script execution in 'http://10.10.10.10:8080/job/test/ws/run/report/index.html' because the document's frame is sandboxed and the 'allow-scripts' permission is not set.
Temporary solution:
- Go to Jenkins main page
- Click on Manage Jenkins
- Click on Script Console
- Paste the following and press run: System.setProperty("hudson.model.DirectoryBrowserSupport.CSP", "")
Go again to the page the was "corrupted" and refresh it
NOTICE: This fix does not survive restart of Jenkins
Fixed Solution:
Ubuntu
- SSH the jenkins machine
- Edit the jenkins default file located at /etc/default/jenkins
- Search for JAVA_ARGS parameter
- Add the following: -Dhudson.model.DirectoryBrowserSupport.CSP=\"\""
- Restart jenkins
CentOS
- SSH the jenkins machine
- Edit the jenkins default file located at /etc/sysconfig/jenkins
- Search for JENKINS_JAVA_OPTIONS parameter
- Add the following: -Dhudson.model.DirectoryBrowserSupport.CSP=\"\""
- Restart jenkins
See this for more information
Checkout with SVNKIT on UNIX - Solving SVN authentication error E170001
Prefix
I'm writing this post since I've seen many encountered this error without an answer including myself and SVNKIT documentation is not at best, for example:
Problem
The following code will run okay in case you in the windows and working in the domain same as the SVN but will not work on UNIX platforms
SvnOperationFactory svnOperationFactory = new SvnOperationFactory();
SvnCheckout svnCheckout = svnOperationFactory.createCheckout();
svnCheckout.setSingleTarget(SvnTarget.fromFile(checkoutFolder));
svnCheckout.setSource(SvnTarget.fromURL(url));
svnCheckout.run();
Solution:
Add the following line after creating the SvnOperationFactory
svnOperationFactory.setAuthenticationManager(SVNWCUtil.createDefaultAuthenticationManager(username, password.toCharArray()));
Complete code should look like this:
SvnOperationFactory svnOperationFactory = new SvnOperationFactory();
svnOperationFactory.setAuthenticationManager(SVNWCUtil.createDefaultAuthenticationManager(username, password.toCharArray()));
SvnCheckout svnCheckout = svnOperationFactory.createCheckout();
svnCheckout.setSingleTarget(SvnTarget.fromFile(checkoutFolder));
svnCheckout.setSource(SvnTarget.fromURL(url));
svnCheckout.run();
Saturday, September 5, 2015
Connecting to Oracle Database using SQL Developer and Wallet authentication method
The story behind this post
A friend encountered a trouble opening a connection using SQL Developer to oracle database using Wallet authentication method.
The ORA error code we got was ORA-12578 TNS: wallet open failed.
After an hour of trying to troubleshoot we were able to make it work.
After an hour of trying to troubleshoot we were able to make it work.
This post documents how to use the Oracle Sql developer while using the wallet authentication
Assumptions
- Your Wallet already setup at the database, if you need any help see http://www.dba-resources.com/oracle/a-guide-to-oracle-wallet/
- You should have the files cwallet.sso and ewallet.p12 files at the end of the process
- Your Wallet storage is setup on your Client (where the SQL developer is installed)
- Your TNS is setup with the connection to the database, example set is:
( DESCRIPTION =
( ADDRESS = (PROTOCOL = TCP)(HOST = 10.10.17.2)(PORT = 5138))
( CONNECT_DATA =
(SERVICE_DATA = demo_srv)
)
)
- Your sqlnet.ora have the needed configuration. Our at the client side sqlnet.ora looked like this:
WALLET_LOCATION =
( SOURCE =
( METHOD = FILE)
( METHOD_DATA =
( DIRECTORY = c:\app\product\11.2.0\client_2\network\admin)
)
)
Preparing
Verifying Wallet connection is working locally
Before trying to work remotely using the SQL developer, verify the wallet is working by doing the following (NOTICE: This requires access to the database machine itself. Not always you have that access rights. If you do not, try):
- Connect to the machine (using SSH or Remote Desktop)
- Connect locally using the wallet authentication method using the following syntax:
- sqlplus /@<your wallet name> (For example sqlplus /@TEST_WALLET_ALIAS
- If you are able to connect on the database itself continue.
Verifying Wallet connection works remotely using sqlplus
If you have installed the oracle client correctly you probably have the sqlplus client (Oracle's proprietary client).
We'll use it to verify the Wallet is working remotly
- Open terminal or command line
- Go to your oracle client installation directory. Our's was at c:\app\product\11.2.0\client_2)
- Go to the network admin directory.
- Copy the sqlnet.ora, tnsnames.ora and wallet files from the database. The tnsnames.ora should have the alias, in our case it was TEST_WALLET_ALIAS
- Connect using the syntax of the wallet authentication
- sqlplus /@<your wallet name> (For example sqlplus /@TEST_WALLET_ALIAS
Connecting using SQL Developer
If you've reached this point, I'm assuming sqlplus worked for you at least remotely.
So, in order to make the SQL Developer use the wallet authentication we'll do the following
- Verify that you have environment variable named TNS_ADMIN in the system environment variables pointing to the directory where the sqlnet.ora directory resides,
- To configure environment variables on windows, go to Control Panel --> System Properties --> Environment Variables
- In the sqlnet.ora you need to direct to wallet directory.
- Create a wallet using the wallet manager
- Copy the wallet files from the Oracle database to the wallet directory
- Create a new advanced connection using the following format
- Connection Name: TestWaller (the name does not really matter)
- Connection Type: Advanced
- Custom JDBC URL: jdbc:oracle:oci /@<your wallet alias> (In our case it was jdbc:oracle:oci /@TEST_WALLET_ALIAS)
Further reading
http://www.dba-resources.com/oracle/a-guide-to-oracle-wallet/
Tuesday, August 18, 2015
How to create a Hello World with IntelliJ and Aspect J
General
Since the whole AOP programming method is new to me AND it took me a while to understand how to work with AspectJ and IntelliJ I've decided to create this brief tutorial on how to setup simple Hello World project using AspectJ and IntellJ.
The Ingredients
- IntelliJ Ultimate (I used version 14, you can get it from here: https://www.jetbrains.com/idea/download/)
- NOTICE: You must have the ultimate edition. I was not able to use AspectJ with community edition!
- I hope you know how to install IntellJ, basically it's next next next.
- AspectJ installation (I've used version 1.8.6, you can get the installation JAR here http://www.eclipse.org/downloads/download.php?file=/tools/aspectj/aspectj-1.8.6.jar)
- You need to install the jar by double clicking on it in Windows or just run the command from command line 'java -jar aspectj-1.8.6.jar'
- NOTICE: Remember where the aspect installtion path since we'll need it later. In windows the default is c:\ (My installation was to c:\aspectj1.8)
So, let's start...
Configuration
- Start the IntelliJ
- Click on Create new project
- Choose Java project
- Don't use template, just click next
- Name the project AspectJDemoHelloWorld
- Click Finish
- Open the settings (in windows Ctrl+Alt+S)
- Type compiler in the top search field, Chooe the Java Compiler. You should see something like this
- Click on Use compiler and choose Ajc (That is the AspetJ compiler)
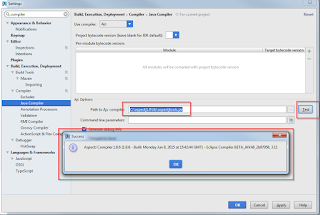
- Click on the 'Path to Ajc compiler' browse button (near the Test button) and choose the 'aspectjtools.jar' at the lib directory of the AspectJ installation (In my case, C:\aspectj1.8\lib\aspectjtools.jar)
- Click on the Test button. You should see something like this
- In the search field, type plugins. You should something like this

- Click on the search field inside the plugins window and type AspectJ. Verify both plugins are enabled

- Press ok
- Open the project preferences (Ctrl + Alt + Shift + S in windows)
- Click on Modules in the left navigation pane and then click Dependencies.

- Click on the plus sign and choose JARs or directories.
- Go to the installation folder of the AspectJ and choose the file 'aspectjrt.jar'

- Press OK.
- That's for the configuration part


Coding
- Go to your src directory
- Create a new JAVA class named Hello, Paste in the following
- Create a new Aspect. Right click and choose Aspect (This ability was enabled due to adding of aspectjrt.jar)

- Name the Aspect World and click ok
- Paste the following in the aspect
- Click on Build --> Rebuild project
- Right click on Hello.java and choose Run
- You should see 'Hello World' in the System console
public class Hello {

    public static void main(String[] args) {
        sayHello();
    }

    public static void sayHello() {
        System.out.print("Hello ");
    }
}

public aspect World {
    pointcut greeting() : execution (* Hello.sayHello(..));

    after() returning() : greeting() {
        System.out.println("World");
    }
}
If you only see Hello, that means the Aspect code was not compiled meaning, you should check the Ajc compiler is the compiler chosen (see step 7 in the configuration part)
Thursday, August 13, 2015
Creating javadocs without the package name before objects (with and without ant)
General
This is a simple one but from some reason it took a while to find the solution.
When creatin javadocs, by default each object comes with it package name.
If you don't want to see the package name before each object, use the noqualifier flag (thanks to http://stackoverflow.com/questions/10766238/javadoc-parameter-without-package-name for the solution)
As ant target
Example Javadoc ant taget
<target name="javadocs" > <mkdir dir="${dir.javadocs}"/> <javadoc packagenames="com.tzachsolomon.example.*" sourcepath="-module1/src/main/java:module2/src/main/java" destdir="${dir.javadocs}" classpath="module1/src/main/java:module2/src/main/java" author="true" version="true" use="true" access="public" windowtitle="${app.name} API" encoding="UTF-8" verbose="false" noqualifier="all" doctitle="<h1>${app.name}</h1>"/> </target>
Thursday, May 21, 2015
JAVA - Separate log files for threads using log4j2
General
I've created this page to document how to create separate log file (in separate directory) using log4j2.
It contains a small example (1 Main thread and 2 test threads), how to and explanation how it works.
I hope you'll find it useful
This tutorial is based on the post at http://stackoverflow.com/questions/25114526/log4j2-how-to-write-logs-to-separate-files-for-each-user!
It contains a small example (1 Main thread and 2 test threads), how to and explanation how it works.
I hope you'll find it useful
This tutorial is based on the post at http://stackoverflow.com/questions/25114526/log4j2-how-to-write-logs-to-separate-files-for-each-user!
Assumptions
- You are familiar with JAVA
- You are familiar with log4j2 configuration
- You know how to link JARs (although I explain how to do it in IntelliJ)
Still, if you need help since something is unclear don't hesitate to contact me :)
Prerequisites
- Download log4j2 from https://logging.apache.org/log4j/2.0/download.html (Current version 2.3)
- Download slf4j from http://www.slf4j.org/download.html (Current version 1.7.12)
How to:
you download the project https://github.com/tzachs/test-log4j2-threads or do the following yourself
- Start IntelliJ
- Create a new project named test-log4j2-threads
- Create a directory named lib
- Move the files apache-log4j-2.3-bin.tar.gz and slf4j-1.7.12.tar.gz to the lib directory
- Extract the files in the directory
- Create 3 classes
- Main.java
- TestThread.java
- MyLogger.java
- Create a file named log4j2.xml
- Copy the following to Main.java
- Copy the following code to TestThread.java
- Copy the following code to TestThread.java
- Copy the following to log4j2.xml
- Link the libraries. In Intellij you'll do it by doing the following:
- Open the Project Structure (Setting). In Ubunutu you can press Ctrl+Alt+Shift+S
- Go to Modules
- Press on the Dependencies tab
- Click on the plus sign and add the JARs. You should see something like this in the end of the process.

- Click on build --> Make (Or Ctrl+F9)
- Press on the run (or Shift+F10)
- You should see a directory named logs created with the following structure:
- logs
- main
- test.log
- test1
- test.log
- test2
- test.log
- Notice that each test.log has messages only from it's own thread
- That's it :)
import org.apache.logging.log4j.ThreadContext;

/**
 * Created by tzach on 5/16/15.
 */
public class Main {

    public static void main(String[] args) {
        ThreadContext.put("logFilename","main");
        MyLogger.init();


        int i;
        MyLogger.getLogger().info("Started");
        TestThread testThread;
        testThread = new TestThread("test1");
        testThread.start();
        testThread = new TestThread("test2");
        testThread.start();

        for ( i = 0; i < 4; i++){
            try {

                MyLogger.getLogger().debug("GUI log");
                Thread.sleep(1000);
            } catch (InterruptedException e) {
                e.printStackTrace();
            }
        }
        MyLogger.getLogger().info("Finished");
    }
}
import org.apache.logging.log4j.ThreadContext;

/**
 * Created by tzach on 5/16/15.
 */
public class TestThread extends Thread implements Runnable {

    private final String threadName;

    public TestThread(String threadName){
        this.threadName = threadName;
    }

    @Override
    public void run() {
        Thread.currentThread().setName(threadName);
        ThreadContext.put("logFilename",   Thread.currentThread().getName());

        MyLogger.getLogger().debug("Starting new loop");
        int i = 0;
        long threadId = Thread.currentThread().getId();
        for ( int z = 0; z < 3; z++){
            MyLogger.getLogger().warn("Thread number: " + threadId + " message number " + ++i);
            try {
                Thread.sleep(1000);
            } catch (InterruptedException e) {
                MyLogger.getLogger().error(e.toString(),e);
            }
        }
    }
}
import org.apache.logging.log4j.LogManager;
import org.apache.logging.log4j.Logger;

/**
 * Created by tzach on 5/16/15.
 */
public class MyLogger {

    private static Logger logger;

    public static void init(){
        logger = LogManager.getLogger("test-log4j2-threads");
    }

    public static Logger getLogger(){
        return logger;
    }
}
<?xml version="1.0" encoding="UTF-8"?>
<Configuration status="WARN">
    <Appenders>
        <Console name="Console" target="SYSTEM_OUT">
            <PatternLayout pattern="%d{HH:mm:ss.SSS} [%t] %-5level %logger{36} - %msg%n"/>
        </Console>

        <Routing name="RoutingAppender">
            <Routes pattern="$${ctx:logFilename}">
                <Route>
                    <RollingFile name="Rolling-${ctx:logFilename}" fileName="logs/${ctx:logFilename}/test.log"
                                 filePattern="logs/$${date:yyyy-MM}/app-%d{MM-dd-yyyy}-%i.log.gz">
                        <PatternLayout pattern="%d{ABSOLUTE} %level{length=5} [%thread] %logger{1} - %msg%n"/>
                        <SizeBasedTriggeringPolicy size="512" />
                    </RollingFile>
                </Route>

                <!-- By having this set to ${ctx:logFileName} it will match when filename
                     is not set in the context -->
                <Route ref="Console" key="${ctx:logFileName}"/>
            </Routes>
        </Routing>
    </Appenders>
    <Loggers>
        <Root level="trace">
            <AppenderRef ref="RoutingAppender"/>
        </Root>
    </Loggers>
</Configuration>

Explanation
So what is actually going on?
As you can see, I've used Routing Appender which is named RoutingAppender in my example.
The pattern to of route is depended on the variable in each Thread context named logFilename.
Notice that I do not handle any thing related to the creating of the files or the directories, it is all done by the log4j2.
All you need to do, is to put a name of the directory you want be created for each Thread, for example, Line number 9 in class Main.java:
ThreadContext.put("logFilename","main")
By typing "main", I've decided that all the logs for the main thread will go to the directory logs/main
For more info see https://logging.apache.org/log4j/2.0/faq.html#separate_log_files
Saturday, February 9, 2013
How to alert user on change in database using AJAX, MYSQL, PHP?
Hi,
I have a simple web page where multiple users are editing the same rows at the same time.
I needed a simple way to alert the users, if the page they were working on is no longer valid.
Meaning, it was updated in the database and they should refresh the page (MY NEXT TASK IS TO AUTO UPDATE).
This example document how to alert the user that the database has been changed and he/she should refresh the page.
Assumptions:
1. You have a working MySQL database with the database named checkupdate
2. In the checkupdate database there is a table named tbl1 with one integer column named _id
Let's start...
Create the following files:
index.html
checkupdate.js
checkupdate.php
I have a simple web page where multiple users are editing the same rows at the same time.
I needed a simple way to alert the users, if the page they were working on is no longer valid.
Meaning, it was updated in the database and they should refresh the page (MY NEXT TASK IS TO AUTO UPDATE).
This example document how to alert the user that the database has been changed and he/she should refresh the page.
Assumptions:
1. You have a working MySQL database with the database named checkupdate
2. In the checkupdate database there is a table named tbl1 with one integer column named _id
Let's start...
Create the following files:
index.html
<!DOCTYPE html>
<html>
<head>
 <script type="text/javascript" src="checkupdate.js"> </script>
</head>
 <body onload="process()">
                Last update:
  <div id="underInput" />
 </body>
</html>
checkupdate.js
var xmlHttp = createXmlHttpRequestObject();
var nIntervalId;
var underInput;

function process () {
 nIntervalId = setInterval(checkUpdate1, 10000);
 checkUpdate1 ();
}

function checkUpdate1 () {

 xmlHttp.open("GET", "checkupdate.php?t="+Math.random(), true);
 xmlHttp.onreadystatechange = handleServerResponse;
 xmlHttp.send();

}

function handleServerResponse () {

 //console.log(xmlHttp.readyState);
 underInput = encodeURIComponent(document.getElementById("underInput").innerHTML);
 if ( xmlHttp.readyState==4 )
  if ( xmlHttp.status==200) {
  xmlResponse = xmlHttp.responseXML;
  xmlDocumentElement = xmlResponse.documentElement;
  message = xmlDocumentElement.firstChild.textContent;
  message1 = parseInt(message);
  underInput = parseInt(underInput);
  if ( message1 > underInput ) {
   alert ("Change was made in db, please refresh the page");
  }
  document.getElementById("underInput").innerHTML = message;
 }
}

function createXmlHttpRequestObject() {

 var xmlHttp;

 if (window.ActiveXObject){
  try{
   xmlHttp = new ActiveXObject("Microsofot.XMLHTTP");
  } catch (e) {
   xmlHttp = false;
  }
 }else{
  try{
   xmlHttp = new XMLHttpRequest();
  } catch (e) {
   xmlHttp = false;
  }
 }

 if (!xmlHttp) {
  alert("Could not create XML Object");
 } else {
  return xmlHttp;
 }
}
checkupdate.php
<?php

$conn = mysql_connect('localhost','root','helloworld');

mysql_select_db('checkupdate', $conn);

$query = "SELECT MAX(_id) FROM tbl1";

$result = mysql_query($query,$conn);

$row = mysql_fetch_array($result);

mysql_close($conn);
 header('Content-Type: text/xml');

 echo '<?xml version="1.0" encoding="UTF-8" standalone="yes" ?>';
 echo '<response>';
 echo "{$row['MAX(_id)']}";
 echo '</response>';

?>
Thursday, February 7, 2013
AJAX, First Example (Based on the new Boston website)
Hi,
As I mentioned, this blog is mostly for me to remember the code I'm learning so I won't be doing much explaining of the code BUT however, I will place links in case I took the examples from some source.
Sources
1. Example was basically taken from http://www.youtube.com/watch?v=tp3Gw-oWs2k, I just change'd it a bit since it wasn't really working.
2. http://www.w3schools.com/ajax/
Assumptions:
1. You have a working web server supporting php
2. You are familiar with PHP
3. You are familiar with JavaScript
So lets start!
1. Create a file name index.html and copy the code below to the file
2. Create a file name foodstore.js and copy the code below to the file
3. Create a file name foodstore.php and copy the code below to the file
4. Place the 3 files in a directory under your web server (meaning you can browse it)
5. Surf to the index.html file.
6.You should see text box. Type your name in it and you should see something like this below the text box:
Sorry, we do not have Tzach
7. Type in tune and you should see the following:
We do have tuna
As I mentioned, this blog is mostly for me to remember the code I'm learning so I won't be doing much explaining of the code BUT however, I will place links in case I took the examples from some source.
Sources
1. Example was basically taken from http://www.youtube.com/watch?v=tp3Gw-oWs2k, I just change'd it a bit since it wasn't really working.
2. http://www.w3schools.com/ajax/
Assumptions:
1. You have a working web server supporting php
2. You are familiar with PHP
3. You are familiar with JavaScript
So lets start!
1. Create a file name index.html and copy the code below to the file
<!DOCTYPE html>
<html>
<head>
 <script type="text/javascript" src="foodstore.js"> </script>
</head>
 <body>
  <input type="text" id="userInput" onkeyup="process()" />
  <div id="underInput" />
 </body>
</html>
2. Create a file name foodstore.js and copy the code below to the file
var xmlHttp = createXmlHttpRequestObject();

function createXmlHttpRequestObject() {

 var xmlHttp;

 if (window.ActiveXObject){
  try{
   xmlHttp = new ActiveXObject("Microsoft.XMLHTTP");
  } catch (e) {
   xmlHttp = false;
  }
 }else{
  try{
   xmlHttp = new XMLHttpRequest();
  } catch (e) {
   xmlHttp = false;
  }
 }

 if (!xmlHttp) {
  alert("Could not create XML Object");
 } else {
  return xmlHttp;
 }
}

function process() {


  food = encodeURIComponent(document.getElementById("userInput").value);
  //alert(food);
  xmlHttp.open("GET", "foodstore.php?food="+food, true);
  xmlHttp.onreadystatechange = handleServerResponse;
  xmlHttp.send();

}

function handleServerResponse () {

 if ( xmlHttp.readyState==4 )
  if ( xmlHttp.status==200 || xmlHttp.status == 206) {
  xmlResponse = xmlHttp.responseXML;
  xmlDocumentElement = xmlResponse.documentElement;
  message = xmlDocumentElement.firstChild.textContent;
  document.getElementById("underInput").innerHTML = '<span style="color:blue">' + message + '</span>';
 }
}
3. Create a file name foodstore.php and copy the code below to the file
<?php
 header('Content-Type: text/xml');
 echo '<?xml version="1.0" encoding="UTF-8" standalone="yes" ?>';

 echo '<response>';
  $food=$_GET['food'];
  $foodArray = array('tuna','bacon','beef','loaf','ham');

  if (in_array($food,$foodArray)) {
   echo "We do have ".$food;
  } elseif ($food==''){
   echo "Enter food";
  } else {
   echo "Sorry, we do not have ".$food;
  }

 echo '</response>';
?>
4. Place the 3 files in a directory under your web server (meaning you can browse it)
5. Surf to the index.html file.
6.You should see text box. Type your name in it and you should see something like this below the text box:
Sorry, we do not have Tzach
7. Type in tune and you should see the following:
We do have tuna
Hello World?!
Hi,
My name is Tzach, 30 years old and I know it's kinda corny but I though to just type Hello World as a good example of posts in the blog.
The whole purpose of this blog is to save and remember code examples or solutions to problems I've encountered during work or coding at home.
I hope that the code and explanations will be coherent enough so that it might use others.
Till next time,
Tzach
Subscribe to:
Posts (Atom)